

Anyone with multiple instruments is more than likely guilty of having a favourite, whether it be a 70s Telecaster, or a 19th century viola. For the lesser instruments in a collection, this means they stay in their cases for months at a time, briefly emerging for a dust off before being returned to their coffin. Problems tend to mount up, and they spend more and more time not doing what they were intended to do. This was the case for my Vox Phantom, which had dropped out of regular circulation, due to a sputtering pickup which I had no desire to fix when I could just play something else. Of course, that’s a problem that only the spoiled collector encounters, so during a moment of ethical crisis and sudden motivation, I decided to have a go at returing the Phantom to it’s full functioning glory.
I’ve had the Phantom for a little over five years now, purchased from Wunjo Guitars in London. Here’s a blurb about their new-old Vox stock:
“Vox Teardrop as you see on this website are made in Wembley, London by the Brandoni company. They are made form parts salvaged from the liquidation of the EKO company who owned the Vox guitar brand until the mid-eighties. Other companies make cheaper copies of the Teardrops and Phantoms, but we tend to not have these in the shop here.”
The sputtering middle pickup occurred after quite a while, but it wasn’t a major problem seeing as it has still had the primary pickups in working order. I neglected fixing it, not only because it wasn’t a major issue to me, but because I didn’t trust myself to fix it at the time, and seeing as the nearest reputable guitar shop is a 40 minute drive, I simply couldn’t be bothered to get a professional to look at it. Laziness is my only vice, honest. So, the middle pickup sat out of use until last week when, inspired by a post from popular Instagram guitar whizz Puisheen, who had a 12-string Phantom in for repair at the time, I decided to put my very basic maintenance skills to the test.
The two big tips I have for anyone attempting any sort of maintenance they’d not done before, whether it be inside a guitar or not, is as follows. First of all, try and find someone who has done it before, and copy them. Thanks to the vast void of the internet, it shouldn’t take much research before you can find someone who’s attempted to do the same as you, or who can at least provide some help in regards to schematics or pictures. Secondly, and probably more importantly, make sure you have the tools to do the job. This wasn’t my first attempt at fixing the Phantom, and the incredibly stiff yet brittle screws of the Bigsby-style vibrato rig were always the speed bump that stopped my repairs early in their tracks. Since then, I had equipped myself with a powered screwdriver and now I had Puisheen’s pictures of the guts of a Phantom to go by too. On to the operation…
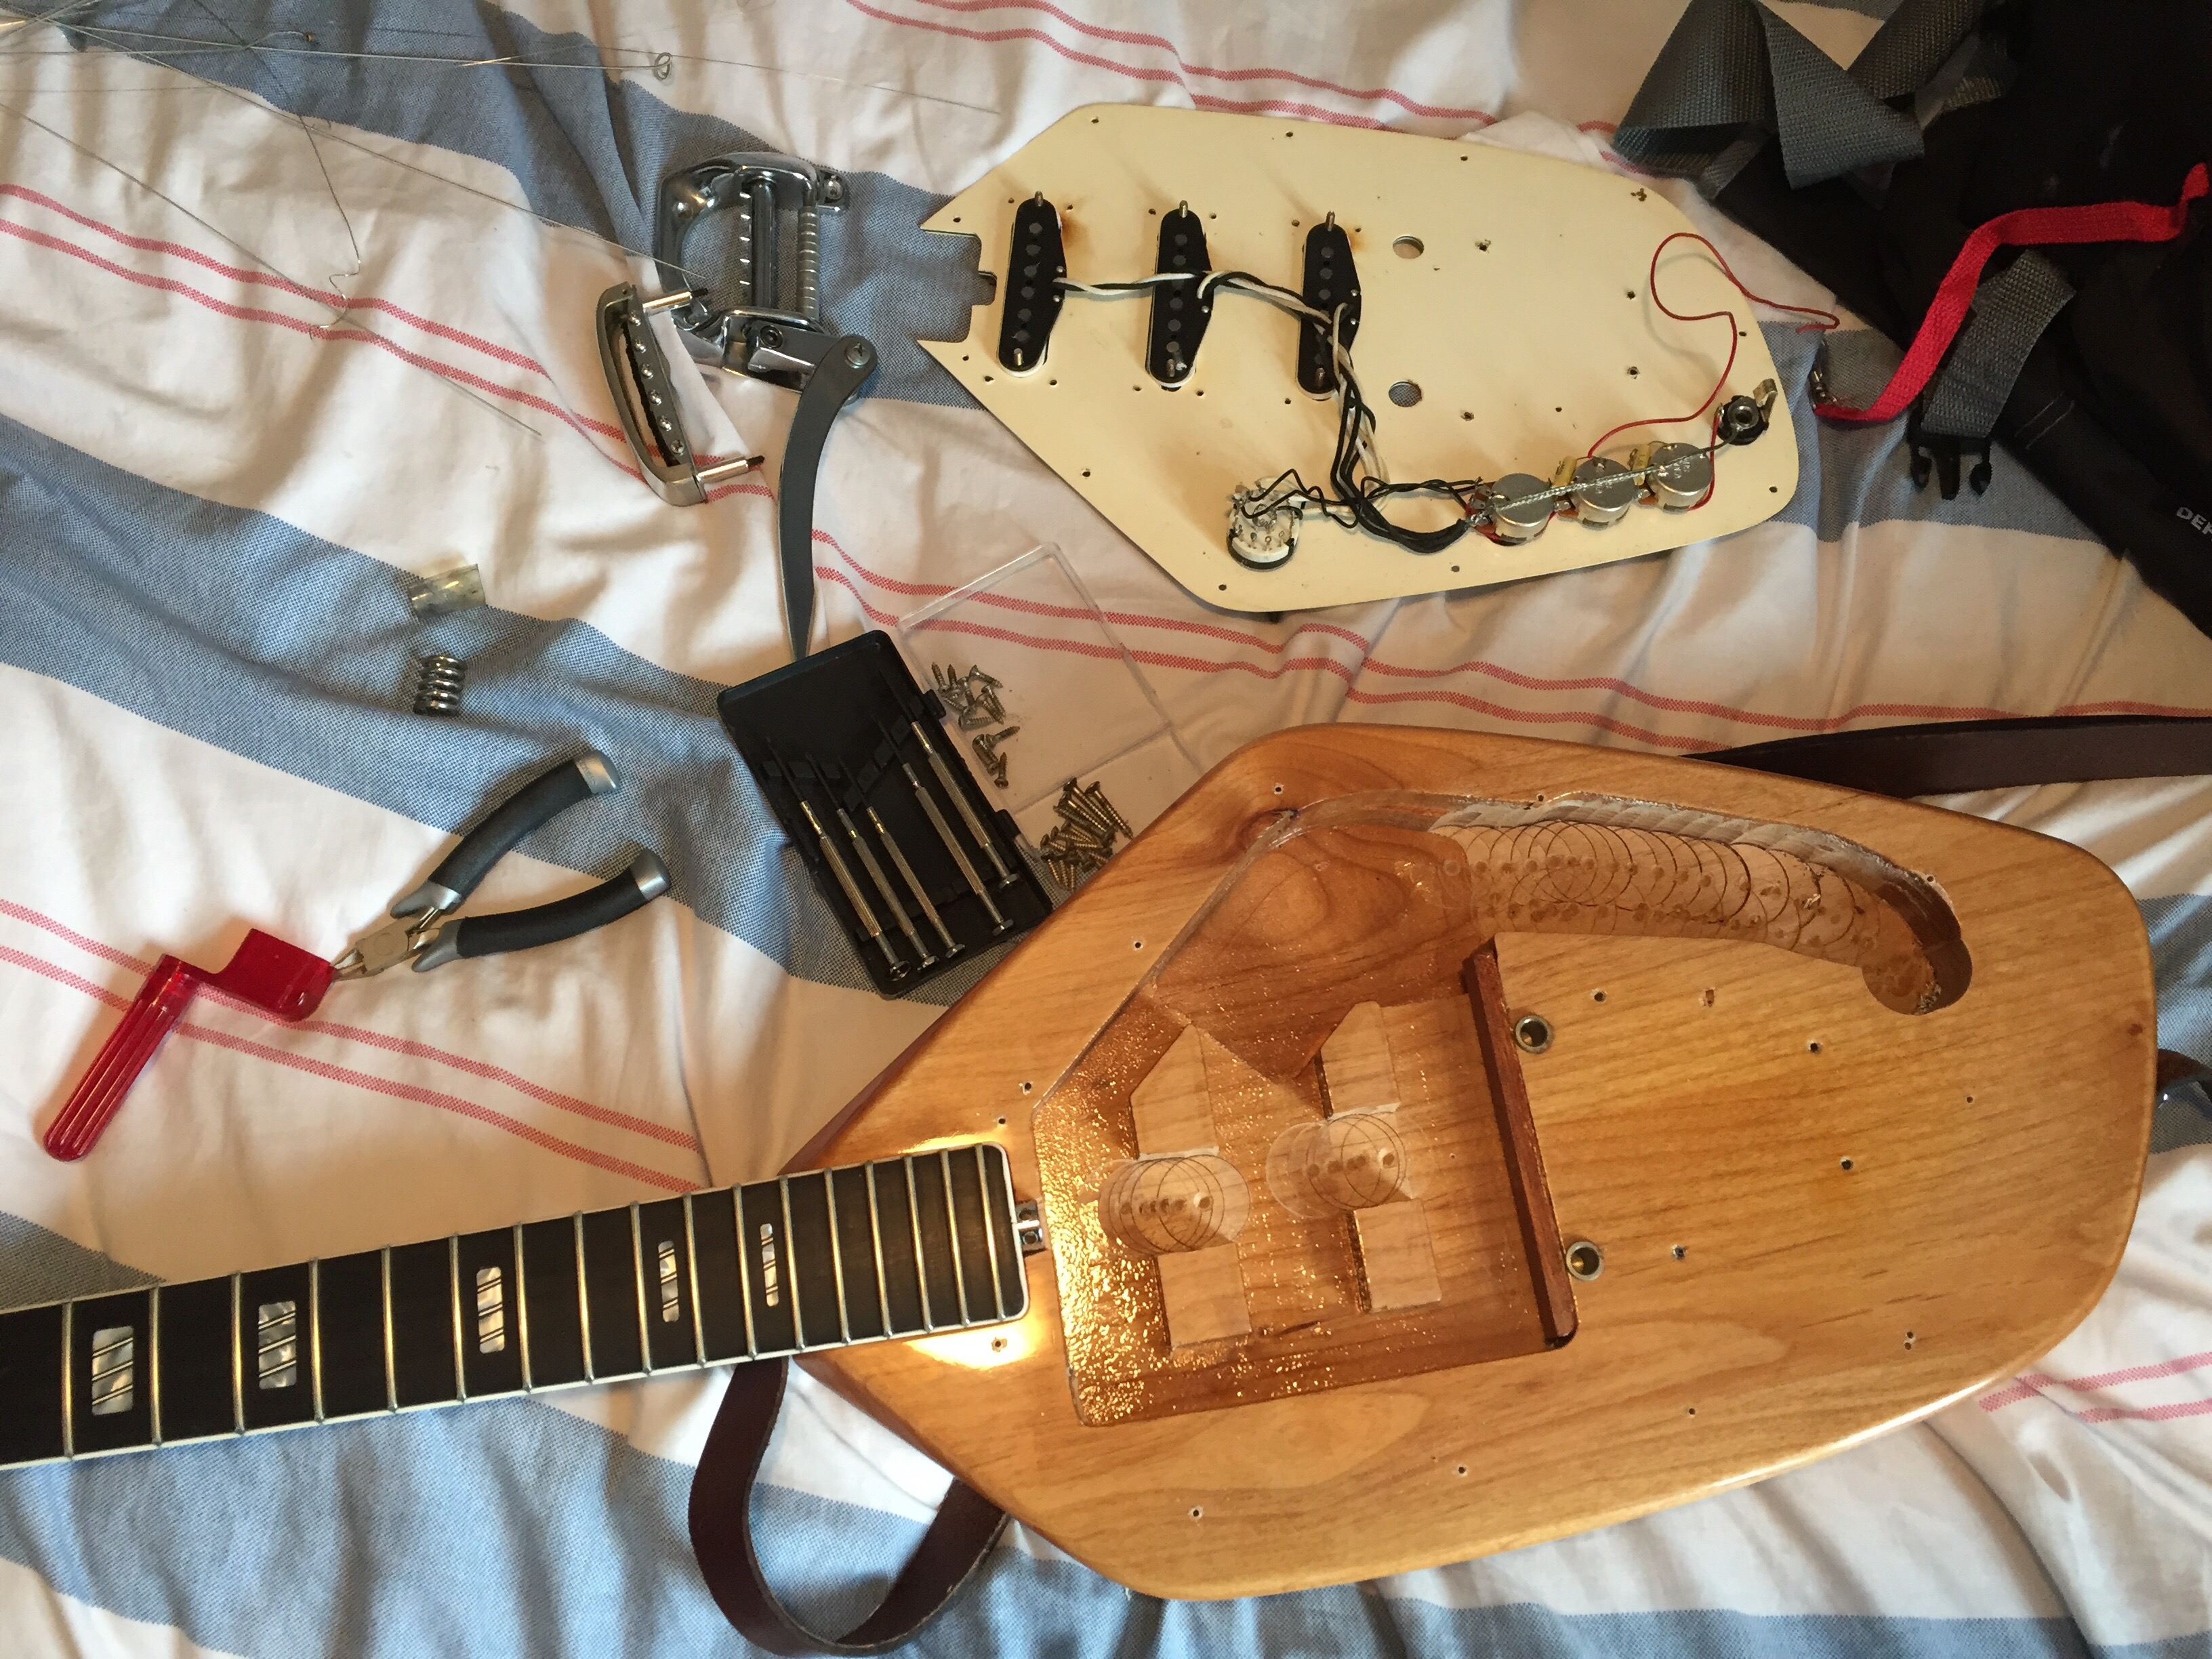
The only tools I used for this operation were: the powered screwdriver, a selection of manual screwdrivers (for anything that the powered screwdriver couldn’t reach), a soldering iron (which I didn’t need to use in the end), and the bits I needed for a string change. After I removed the withering strings from the Phantom, I started to remove the screws around the circumference of the pickguard with the powered screwdriver. I could have used a traditional, hand-operated screwdriver here, but the powered one was a lot more fun and much quicker. Setting these screws aside, I also removed the 12 screws that held the pickup frames in place, as some of these were also attached to the body. Finally, I removed the spring from the Bigsby, and used the powered screwdriver to remove those horrible screws that mounted the rig to the body (more on those later). Voila! The pickguard was finally removed, and I could finally take a look inside.

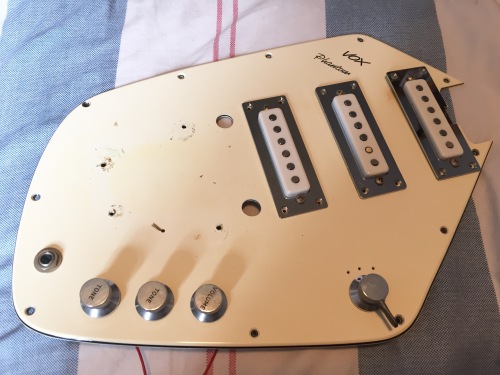
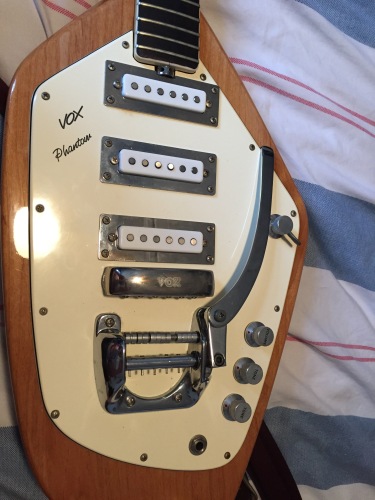
Whilst my main objective was to fix the middle pickup, I also thought I’d take this opportunity to shield the cavity of the Phatom, and replace the Bigsby screws. To begin with, I started troubleshooting what could be wrong with the pickup. My first thought was that pickups connection could be a faulty in some way, so I did a quick bit of re-soldering on the pickup ground connection to the volume pot, as this seemed to be the only joint that looked a bit dodgy. The Phantom is wired up like a Stratocaster, excluding the rotary switch instead of a 5-way blade switch, so I was fairly familiar with where everything should be in regards to wiring. I reattached the Bigsby to the pickguard (notice the ground wire pokes through the pickguard to ground the bridge) and tested the pickup again.
Still, the pickup was cutting in and out, seemingly at will. Upon closer inspection of the joints, I could see that a thread of wire from the middle pickup hot wire was poking the metal case of one of the tone pots, which could have been the source of my intermittent shorting. After poking the stray wire back around the lug that it was supposed to be attached to, I tested the pickups again, and everything worked fine. Hurrah!
On a side note, some of you might be wondering how I tested the pickups without restringing the guitar. Once I’d made sure everything was grounded and connected as it should be, I plugged the guitar into my amp, and simply tapped on the poles of the pickups with a metal screwdriver. If everything works, you’ll hear a loud knocking coming through as you tap. You can also test the volume and tone pots with this method, and the knocking should decrease in volume and change in tone respectively as you mess with the knobs.
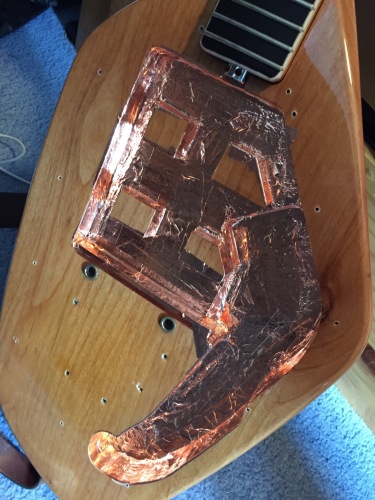
It’s worth nothing that if I was a proper guitar technician, then I would have re-soldered the joint to keep the stray wire in place, But as I said, laziness is my only vice. Also, if I was a proper guitar technician, I probably would have shielded the pickguard before I started messing with the wires. Oh well, I’ll never learn. On to the shielding, I used some soldering tape with conductive adhesive I found on Amazon for around £6. Using this tape can be quite a long process, so I stuck Phantasm on the telly and started covering the body cavity with tape, occasionally looking up to see a flying sphere drill into people.
Once I was sure the cavity was completely covered, I removed the pots, switch and jack from the pickguard, and applied tape to the back of it. If I was a proper tech, I would have taken a photo of this to show what I mean, and I would have removed the pickups to make it easier to apply the tape, but yet again, laziness. You can read about the perceived benefits of insulating guitar cavities from a more informed person, but the basic reasoning behind it is that the tape on the pickguard and on the cavity form a ‘cage’ around the pickups, so long as the tape on both pieces touch, which shields the pickups from interference, such as mains hum (which is rampant in my house). Once everything was covered in tape, I put back the pots, switch and jack (making sure to keep track of that stray wire from earlier), and screwed everything back together. I tested the pickups again, and still everything worked. Phew.

Now, on to the next job. The Bigsby is attached with four screws, that run through the pickguard and into the body of the guitar. Two of the screws were fine and I used these to attach the Bigsby to secure the ground wire whilst I was sorting out the pickup problem. However, the other two screws were pretty much destroyed do to some mishandling on previous repair attempts, so it was time to replace them. As I live in an area with a lack of amenities, I scoured eBay for screws of the same dimension, measuring the length and width of the thread to make sure everything would fit. Once the screws arrived through the post, I switched out all the original screws for new ones, no drilling required. I decided to hang on to the old, mangled screws in case I ever sold the guitar and some maniac wanted all the original parts. People are strange.
Once everything was back together, I tested the pickups again with my screwdriver, just to reassure myself I wouldn’t need to open the Phantom up again anytime soon. Everything still worked, luckily. Next, I needed to restring the guitar, and I decided to use a set of D’Addario EXL110W Nickel Wound strings, which run 10-46. I normally use D’Addario’s EXL110 10-46 sets, but I fancied trying out something a little different for this, to see how I liked using a wound G-string (spoiler: I didn’t like using a wound G-string).

Before I start fitting new strings on any guitar, I give the body a good clean with a good gloss guitar polish, as without the strings, I can reach every nook and cranny. Afterwards, I rub in some fretboard conditioner, unless the fretboard is lacquered or finished in any way, as this can strip the lacquer or finish off. I also line up the holes of the tuners so they are perpendicular to where the strings will lie, as this can help keep the strings anchored when I’m tuning up (you’ll see what I mean).

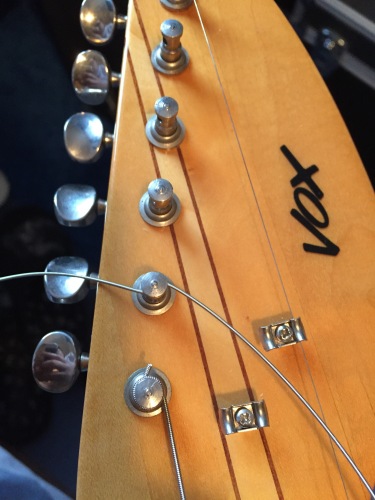
Although Bigsby are incredibly cool, they are also incredibly fiddly. Even more so when you have a covered bridge, like the Phantom ( although halfway through this string change I found out the bridge cover can be easily popped off, but let’s ignore that for now). As you have to do some finger gymnastics to thread the string on to the pegs of the Bigsby, I’ve found that adding an S-shaped kink into the end of the string will make your life a bit easier. Once you get the string under the roller, you can pull it up with your fingers or some tweezers, then pop the end on to the peg. The kinks will allow you to grab the string a little easier, and help stop it from falling back through the gap between the rollers and the pegs, as seen below. Don’t worry about having permanent kinks in your strings, as these will stretch right out as you begin to tighten the string later. If you’re having trouble getting the ball on to the peg, I find depressing the Bigsby arm a little will bring the peg closer to string, pulling it taut again once you let go of the arm, which can stop the string flailing about.

Now on to the other end of the string. There are countless better guides to winding strings than the one I’m about to present, but seeing as I’ve met several semi-pro musicians who couldn’t change a string, I thought it worthwhile writing my method down, just in case it hammers home how easy changing a string is. Saying that, even with the kink at the ball end, the string will still resent being fitted to a Bigsby and will try and pop off the peg at all opportunities. All you can do is remain calm, and take your time whilst winding the strings, as they can sense anger and will flail more if your blood begins to boil.
First off, I pull the string taut along the neck, laying it into its nut slot and under any string arms that are in the way. I pull the string past its tuning peg and up to the next one, adding a right angle bend in the string where it meets the next tuning peg. I then thread the string through its designated hole until the bend meets the hole, at which point I add another bend, to produce another S-shaped kink, like the one I did at the other end of the string. By putting the first bend in past the tuning peg, I’m giving the string enough slack to wrap round the tuning post a couple of times, and the second bend just secures the string in the peg while I tune up.

When it comes to wrapping the string around the peg, I go for the over-and-under method, where the string goes over the hole once, then under it for all the subsequent wraps. You can find a more detailed method of how to do this online, as this seems to be the default method for most people who write guides on how to string guitars, but there isn’t really a lot to it. I normally aim for two wraps underneath for the E/A/D strings and three wraps for the G/B/E strings, in addition to the one over the hole, obviously. I’ve never had any problems with tuning stability using this method, so I recommend this extra security measure to everyone who’s struggling with strings.

Once everything’s where it should be, I plugged in and tuned up. This was the first chance I had to hear everything with the strings too, so I was relieved to see everything still working. It’s important to break in new strings, and I’ve heard quite a few people put off changing their strings because it takes so long to break them in to stop them in once they’re on. So, here’s my method for anyone struggling with unstable new strings. Starting with the low E, then moving to the high E, then to A, then to B, etc, I tune everything to a fraction higher than standard tuning. I’d read somewhere that working back and forth like this distributes the tension on the neck, but I don’t have any scientific proof of it. It works for me, so I stick with it.
Next, I start stretching the strings. To start, I rub the strings with a string cleaner/lubricator, then I stretch each string in three positions; first, by holding the string at the 1st fret, pulling the string several times towards the centre of the fretboard, then moving hand down to hold it at the 7th fret, pulling the string again several times, before moving to the 12th fret, stretching the string once more. Again, I have no scientific basis for doing this, but I never have any tuning stability problems with new strings after I’ve performed this slightly over-the-top ritual, but you might find your own way that works for you. After stretching, I tune everything back up to standard pitch and rock out for a while, making sure to give the Bigsby a good bit of use, checking the tuning regularly to make sure nothing is going out of tune when it shouldn’t be.
Even with all this, I sometimes find it can take a day or two for the guitar to return to its natural playing state, just like it was before I started applying my ointments and digging about inside, albeit with fresher sounding strings. This was especially true for the Phantom, as it was sat without any strings for close to a week. Sometimes it’s hard to believe how much tension is put on the neck by the strings, and that wood is surprisingly malleable, bending and twisting according to the environment. However, a gentle hand and a patient mind will keep everything running smoothly.
The main purpose of writing all this out is not to impose my own non-qualified methods on anyone, but to add my own thoughts and pictures to the Great Big Internet Guitar Database. I find it’s incredibly difficult to find articles and guides about anything that isn’t a Strat/Tele/Les Paul, which is no good for the hundreds of guitars that don’t evoke Slash, or worse, Eric Clapton. There’s no such thing as too many contributions in my mind (so long as there’s no exaggerating or falsifying of professional credentials). Thanks to these little contributions, I saved myself a potentially expensive trip to a guitar tech, and also got to know my Phantom a little better. So, don’t be afraid to try for yourself. Things really aren’t that frightening after all.
